


Complete step-by-step instructions for one of the most popular crypto wallets – Metamask. It is my duty to tell about this to all newcomers, who are becoming more and more lately.
In the article you will find answers to questions: how to install, how to deposit, why tokens are not displayed, how to swap on uniswap, can Metamask be used with Binance Smart Chain and other blockchains.
Over the past few months, quite a lot of new users have come to the crypto. They often ask a lot of questions about the crypto and more often these questions relate to Metamask, how to use it, how to swap on Uniswap, 1inch, how to monitor gas prices, how to look for contracts or participate in sales from various projects.
I tried to make step-by-step instructions about the Metamask wallet by answering frequently asked questions.
What is Metamask?
One of the most popular Ethereum wallets is Metamask.
MetaMask was originally developed and released by ConsenSys. Also, Metamask was originally an extension for Chrome and Firefox. It is now supported by many browsers including Opera, Safari, Brave, and more. It has been downloaded over four million times since its launch in 2016.
Through this extension, users can transfer ERC-20 tokens, exchange them, trade, make payments, store crypto, interact with various decentralized applications, play games, buy rare digital works of art and much more.
After years of development, ConsenSys decided to release a mobile application for iOS and Android. An internal browser is installed inside the mobile wallet. Thanks to it, you can do exactly the same thing as with a regular browser extension.
In general, MetaMask makes Ethereum as easy to use as possible for the maximum number of people. By the way, it is used by more than 2 million people, thanks to the popularity of the Ethereum network and decentralized finance (DeFi).
It is also worth noting that Metamask has the ability to support other networks and switch between them. For example, you can set up the Binance Smart Chain (BSC), Huobi Eco Chain (HECO), Avalanche network, and many others in your Metamask and use applications on other blockchains. This greatly simplifies the work with many projects, sales, crypto transfers and others.
And so, let’s move on to the practical part.
MetaMask Installing

In order to start using the extension, you first need to go to the official Metamask website. Press the button “Download now”. Here we are already offered to choose a browser: chome, IOS, Android. Next, you need to select and install the extension, indicating which browser we will use. In this guide, we will use MetaMask Chrome as an example, but the same steps apply to other browsers as well.
Once the extension is installed, click the Metamask icon on your browser’s toolbar to open the app. Then we press “Start”.
Selecting the MetaMask login type
Next, we will be asked to choose whether to import an existing wallet, or create a new one. If you have a Metamask wallet seed phrase, then you can import it, which in principle is quite simple.

Insert 12 words and set a password for the wallet. You can set different passwords for each device to which you import data.
Let’s now click “Create a Wallet”.

Usage data
Next, Metamask offers us to accept or refuse whether it will collect our data on the interaction of our wallet with other services and sites. Here you can opt out if you wish.
Password setting window
We create a password for the wallet. You must create a secure password that contains at least 8 characters. I advise you to use capital letters, numbers, underscores and other symbols for a more secure use of the wallet. But we will talk about the security of the wallet a little later.
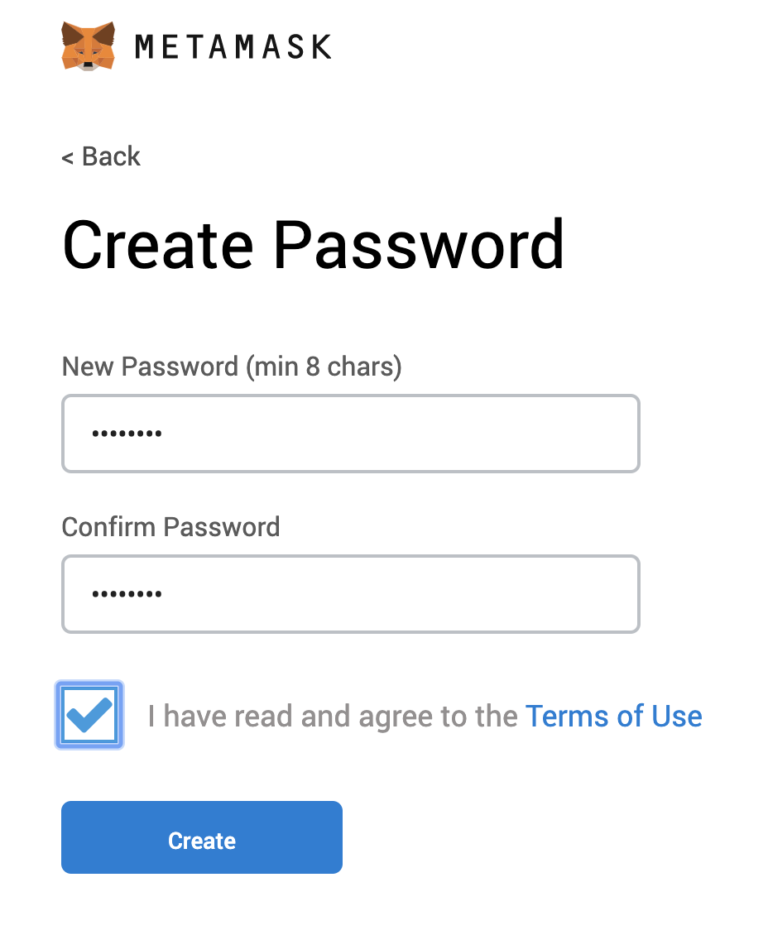
There is one nuance here. If you forget your password, you can still log into Metamask using the seed phrase. As you saw at the beginning of the review, you can simply import an existing wallet.
After creating a password, you will be able to see the video instruction.You can look for better understanding.
Protect your wallet
- What is a recovery passphrase?
Your recovery passphrase is a 12-word phrase that is the “master key” to your wallet and your funds. - How do I store my recovery passphrase?
– Save to password manager.
– Keep in a bank vault.
– Keep in a safe deposit box.
– Record and store in several secret places. - Can I share my recovery passphrase with anyone?
Never share your recovery passphrase with anyone, not even MetaMask employees! If someone asks you to provide a recovery phrase, this person is most likely trying to deceive you and steal money from your wallet.
In the next window, click on the gray area to unlock our seed phrase.

You will see a set of 12 “seed words” for your Metamask. Click “Save seed phrase as file” and copy the file “seed phrase MetaMask” to a safe place. You will need it to access your wallet.
Very important! MetaMask is a non-custodial service, which means that no one else can access your funds – not even the developers of MetaMask. It can be said that your tokens exist in the browser’s encrypted storage, which is protected by a password. This means that if your computer is lost, stolen or destroyed, you will not be able to recover your wallet. Your private keys will be forever lost.
Therefore, it is extremely important to write down a backup phrase. This is the only way to recover your account if something happens. We recommend that you write down the words and store them in two or three different places. It is not necessary to put them in a fireproof safe and bury them in a dense forest, but it will not be superfluous.
The next step after you clicked “I copied it to a safe place”. You will be taken to your Metamask wallet!
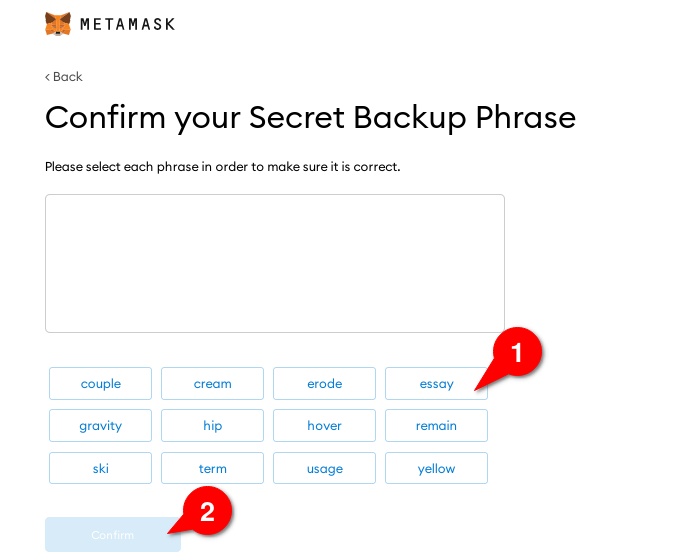
I click on the words of our original phrase in the correct order (1) to prove that we have written them correctly. Then click “Confirm” (2).
Metamask wallet is now ready to use.
After all these procedures, you can now begin to fully use your personal wallet. To replenish the balance, just click on copy the address and you can send your Ethereum or ERC-20 tokens to it, for which there will be one wallet address.
It is also possible to buy ether from a bank card, but this will cost more and take much longer than a regular withdrawal from the exchange to the wallet. This feature is rarely used due to high commissions and interest for buying coins.
It is worth noting that all commissions in the network are paid in ether, therefore, it is necessary to control the amount of ethereum when you interact with the wallet.
You will see your balance at the bottom of the wallet (3) after your funds have been credited. ETH will be displayed by default. If custom ERC-20 tokens are not displayed, click “Add Token” to add these tokens to the list.
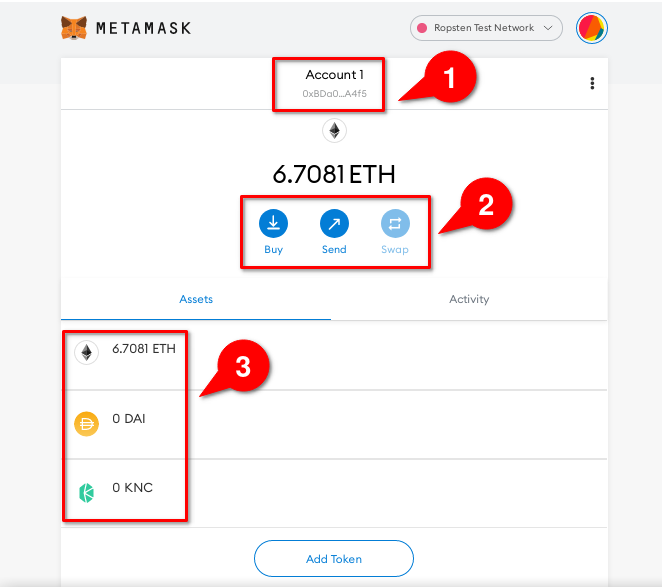
That is, you add a token contract that you exchange or send to a wallet. For this, it is best to use the site koingekko. They recently added the ability to directly connect the token you need.
On the site we are looking for the token we need, it will be, let’s say USDT or USDC, in the contract line we can copy it, or click on the face of the fox and the token will automatically be added to the wallet.

Website etherscan.io
It may take a few minutes for your ETH to top up, depending on the network load. The greater the load, the more the transaction is confirmed and the more expensive the transaction on the network can be. Therefore, we recommend using the site to monitor the cost of transactions, the swap of tokens, which displays the current cost in gas and dollars, and if you enter the wallet address on the site, you can monitor transfers, wallets and the current state transactions.
How to send tokens via MetaMask
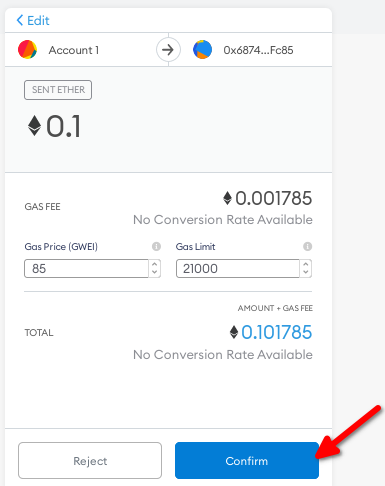
Now let’s try to send cryptocurrency to another wallet or exchange address. To do this, click the “Submit” button on the main Metamask panel. We enter the amount of ETH or other cryptocurrency that we want to send (1), and the amount of the transaction fee that needs to be paid (2).
Then click “Next” (3).
A higher fee will help confirm your transaction faster. Metamask automatically sets the default fee. However, sites like ETHERSCAN can help you manually find the perfect board.

Click “Next” (3) to complete the details of your transaction. Then click “Confirm”. Again, it may take some time for the transaction to be confirmed.
You can check the status of your transaction in Metamask’s Activity panel.
How to use DeFi apps
If you want to spend your ETH on a DApp, choose the app from DAppRadar. In this example, we will use Uniswap, which is a decentralized ERC20 token exchange powered by the idea of an automated market maker (AMM). That is, you can easily exchange ether, USDT, USDC and hundreds of other altcoins for others.
Let’s go to Uniswap. We enter the amount of the cryptocurrency we want to buy and select the tokens we want to exchange (1). Then we connect our Metamask wallet with Uniswap by clicking “Connect Wallet” and selecting Metamask (2).
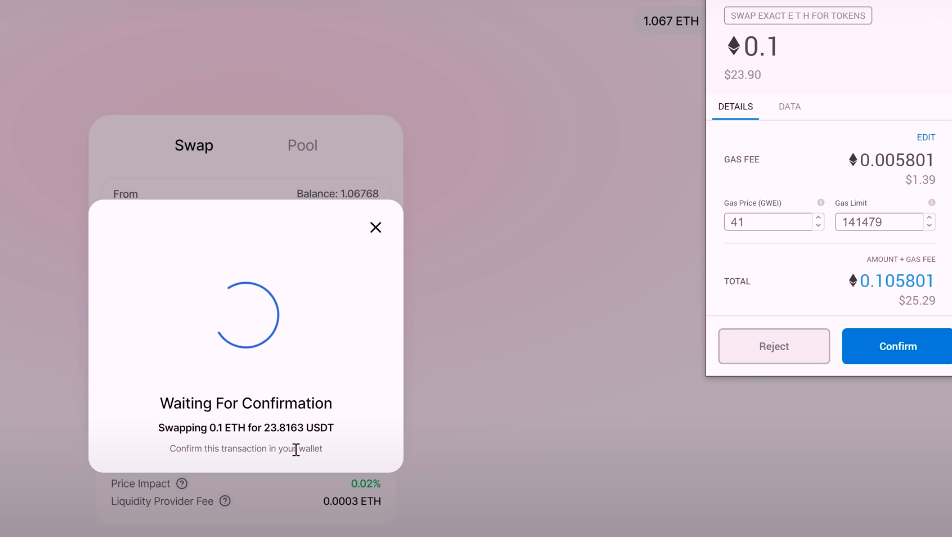
Exchange of tokens on Uniswap
The Metamask panel will appear. Connecting to Uniswap. Click Next, then Confirm.
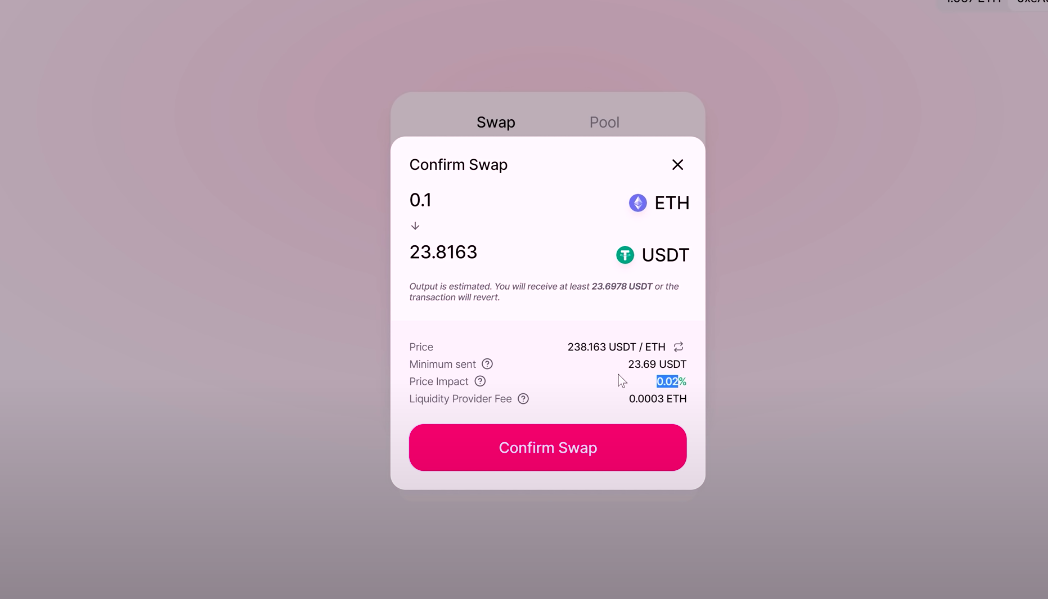
Exchange Confirmation
We return to the Uniswap web page and click “Swap” (1). Then, in the pop-up window, click “Confirm” (2) to complete the transaction and confirm the transaction is already in the wallet.
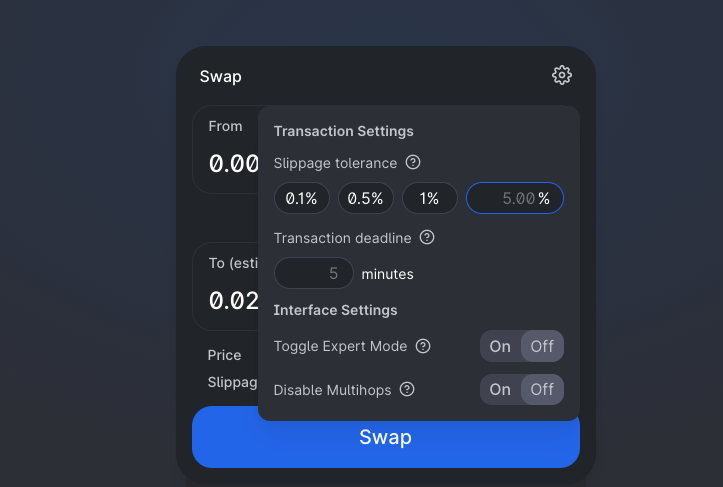
Token swap slippage settings
Before buying any tokens, you can specify a token exchange slippage so that you do not accidentally buy tokens at a different price. If the price changes a lot at the time of the exchange, then the transaction will not go through and the tokens will be returned to you.
Tokens growing in price are in high demand, and therefore, making an exchange with such demand, it is necessary to increase the slippage tolerance and increase the cost of transactions so that the transaction is processed faster. But we do not recommend setting more than 5%, which can lead to transaction problems due to frontrunner bots.
Frontrunners, or arbitrage bots, monitor the mempool for pending transactions that may contain a profitable trade. They are usually set up to track a specific type of transaction, such as DEX trades or oracle updates, and try to get ahead of them using a preset algorithm.
The next thing we see is Transaction deadline or Transaction expiration. The time function indicates the period after which the transaction can no longer be executed. That is, after the expiration of time, it will be canceled.
In general, be very careful with this.
Additional features of Metamask
Now that you know the basics of Metamask, you can use all the features of Ethereum, in addition to the usual token exchange, sending, you can also store collectibles and non-fungible tokens (NFTs). Also connection to Ledger and Trezor hardware wallets.
In Metamask, there is also the ability to switch between networks, that is, you can configure the wallet in such a way as to switch to another network, in addition to Ethereum and test, there is a Binance Smart Chain network from the Binance exchange and Heco-Chain from the Huobi exchange. They will essentially allow you to do everything the same as in the Ethereum network, only already in the Binance or Huobi ecosystem.
Binance Smart Chain Metamask
Now let’s connect to the Binance Smart Chain network through our wallet. We need to access the settings to enable nodes on the Binance Smart Chain network for the wallet.

Select “Settings” from the dropdown menu.
On the settings page, find the “Networks” item.
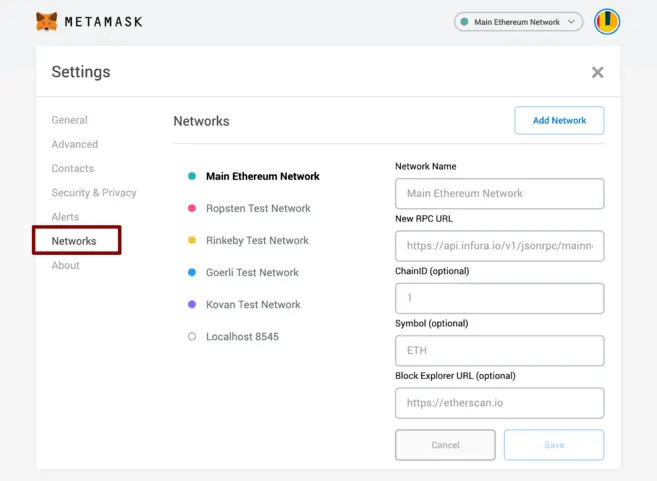
Click “Add Network” in the upper right corner to add Binance Smart Chain manually – it is not connected in MetaMask by default.
Here are the parameters that need to be added so that we can work with the main BSC network:
- Network Name – Smart Chain
- New RPC URL – https://bsc-dataseed.binance.org/
- Network ID – 56
- Symbol – BNB
- Block Explorer URL – https://bscscan.com
Specify all the data very carefully, otherwise, the network simply will not work. On Heco-Chain from the Huobi exchange. Everything is configured in the same way.
Once connected, you can transfer BinanceCoin (BNB) from Binance to the copied address.
Important! To transfer from the exchange, use the BEP20 network! After that, expect your BNB in your Metamask account! On the Binance network, the BNB token will be used for payment with all transactions. Here, the commissions are many times cheaper, but always be careful with this. Well, interaction with applications that are running on Binance Smart Chain will be essentially the same as in Ethereume. That is, there is an analogue of uniswap, various pharmaceuticals, NFT platforms and much more.
How to transfer tokens between networks
To transfer tokens from one network to another, you can use blockchain bridges. The main task of such a bridge is to provide a connection between two blockchain ecosystems, through which it will be possible to transfer tokens.
For example, you can use the Binance Bridge service, a secure and fast way to transfer cross-chain assets to Binance Chains. We will talk more about bridges and cross-chain transactions in a separate article.
Additional links to materials
- Metamask official site
- Exchange of tokens on Uniswap
- Connecting Binance Smart Chain (BSC)
- Connecting BSC and Huobi Chain
- Connecting Avalanche Network
What are the disadvantages of Metamask?
- This is what MetaMask stores private keys in the user’s browser. It is less secure than a hardware or paper wallet. This is a reasonable compromise for ease of use. But in fact it is just an intermediary.
- External Nodes – Instead of being a full node, it relies on external nodes that sometimes have downtime that can cause MetaMask to stop working.
- High commissions in the Ethereum network, the network has been often loaded lately, which is why the cost of commissions is growing.
FAQ
What is MetaMask?
MetaMask is a crypto wallet available as a browser extension and mobile application. Thanks to MetaMask, users can transfer ERC-20 tokens, exchange them, trade, make payments, store crypto, interact with various decentralized applications, play games, buy rare digital works of art and much more.
What are the disadvantages of Metamask?
This is what MetaMask stores private keys in the user’s browser. It is less secure than a hardware or paper wallet. This is a reasonable compromise for ease of use. But in fact it is just an intermediary.
What networks can be connected besides Ethereum?
You can connect Binance Smart Chain (BSC), Huobi Eco Chain (HECO), Avalanche network, Polygon and many others to your Metamask and use apps on other blockchains.
Disclaimer: This article is not investment advice. Assess the risks yourself before making any investment decisions.
Join my telegram channel.
All crypto articles are here.
Reviews: